Followers

Thursday 29 November 2012

Rose Creation and Note Card Holder Tutorial

Rose Creation and Note Card Holder Tutorial

Hi Everybody
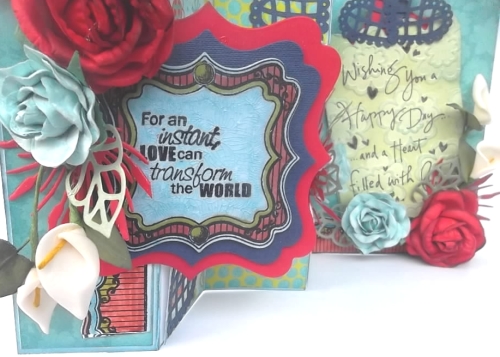
Shalini Pahwa here, today i'm going to share the tutorial on creating a flower using Spellbinder Die-Rose Creations and a Note-Card Holder


 These are the supplies that u need...

For the Note Card Holder-Cut a piece of paper, 3" x 11" using Fiskars Paper trimmer and punch on the top edge-used martha stewart deco shell , and distress the edges using tim holtz distress ink  (spiced marmalade).Next, cut a piece for the bottom, 3" x 4" and score each side at an 1/2"( martha stewart scoring board). Construct a small box out of the cardstock and wrap it on the outside with 1/4" Scor-Tape


Wrap the paper around bottom piece.  Tip:  I pinched the corners when I came to them. Attach a piece of Scor-Tape to the edge and close the basket.


For the flower-I have used  Spellbinder Die-Rose Creations …I used 5 layers of flower die, after cutting I crumpled them and after opening them distress the edges using tim holtz distress ink (used Spiced Marmalade, Vintage Photo) ,the darker layer ---on the edges, after applying the medium I applied the perfect pearl golden colour, and now assemble them together with brad or u can use pollens…


and decorate your note card holder


And it's done!!!!!

Hope u liked the tutorial!!!
All the products used here r available at http://www.crafterscorner.in or you may contact Shalini Mittal at info@crafterscorner.in

Have A Nice Day!!!

Wednesday 28 November 2012

FANCY FOLDS

Hi Friends,

I,m Anita here with a fancy fold card namely a TRI SHUTTER CARD.
Without much ranting, here is my card in different angles.


 Now, let me give you a detailed description of the supplies used.
The highlight of this card is the crackled effect that I have used on the blue spellbinder label. If you click on the image to enlarge it, you can get to see the beautiful effect created by the Inkssentials Crackle Medium by Rangers. The next thing that is very dear to me is the Just Rite Stamps-Cast Your Cares. Now this is the first time I,ve used the Just Rite clear Stamps, and the lovely crisp image it gives is too good.
I,ve coloured the stamps with my new Distress Markers. The beauty of these markers is that you can give detailed colouring with the 36 shades and are must have for any crafter.
The labels are from Spellbinders.
Patterned paper is from Bo Bunny-Alora
The flowers are from mulberry collection in the store.
Crafters Corner has most amazing collection of mullberry flowers so do check them out.
The dies are from Marianne Anja Leaves-3 and Leaves. The sentiments are from Fiskars and Hero arts.
Crafters Corner strives to bring the best possible craft supplies to you at reasonable rates so even if you cannot see a particular thing in the store site, you can always drop a mail to Shalini at info@crafterscorner.in.
Do check out the new arrival section at the Crafters Corner --which really has all supplies under one roof.
And just a day is left to take part in the Die cuts/Punches  challenge # 2. So get going!!!
Hope you all had a very happy festive season!!!

Tilda with pencils

Hello crafters,
its kavitha here with another inspiration card here for this month.I have used my most favorite tilda-Tilda with pencils for this card.I have stamped the image on spellbinders label 22 with Memento tuxedo black ink.Colored the image with Distress markers.The beautiful lace corner die is from cherry lynn.The heart shape is distressed with tumbled glass ink.Finally added some  mulberry flowers and MS leaf punch.
I hope you liked my card.
Happy crafting,
kavi
 http://www.crafterscorner.in (All craft supplies under one roof)
For any further information regarding any of the products please contact :- info@crafterscorner.in

Sunday 25 November 2012

Dreamy Tags

Dreamy Tags

Hello Everybody
I'm Shalini Pahwa here-- Today I'm going to share another project with you using silver super fine embossing powder and distress marker  by ranger ...
This Blue tag ----at the background i had stampe using embossing ink and then used  silver super fine embossing powder  (believe me this embossing powder result is fabulous) and heat it with Tim Holtz Tool and then distress the background using Tim Holtz ink-mixing stormy sky with black soot, wings are spellbinder die ,then added mullberry flowers and used Tim Holtz idea-ology-locket keys, added ribbon.


This yellow tag first i  stampe  the butterfly for this i used the Distress marker-Ranger-Mustard seed and aged mahogany, distress the background using Tim Holtz ink mixing mustard seed with peeled paint, and tea dye used  stamp again( running text) , used pinkpaislee glitter sticker alphabet -WISH, added the lovely fence die from magnolia, used mulberry flowers and added leaves( used marianne die) around the mulberry flowers,  used spellbinder die- creative page tabs and added ribbons with leaf

The products are all available at  http://www.crafterscorner.in and u may enquire at info@crafterscorner.in

Hope you all like my work, and don't forget to comment on it

Have A Nice Day!!!!

Love
Shalini Pahwa

Thursday 22 November 2012

Crafters Corner - Wedding Invite

Hello Friends  ,
This is Mallika here from Aola Handmade Cards back with a new DT project .
I am stuck with some fever and throat problem is practically killing me .
I have basically made a wedding invite ,using my favorite black and white combo and lovely cherry lynn dies.
It is a center Step card of 8 by 11 inches { Front }
I have kinda made this sorta arrangement before but I cudnt part with it .
I am practically hooked to this cherry lynn die " Wedding vows " .
This one screams Cherry lynn and Spellbinders .
I have used beautiful Spellbinders floral ovals for the sentiment .
I have used victorian romance flourish and Fanciful Flourish .
Can you notice the arch made my Favorite Doily from cherry lynn .
I have embossed the bg and distressed it by black soot for the first time .. Simply in love with damask .
The hanging sign also has a board which has You are Invited written . This boards is basically a tag from Spellibinder .
The head pins can you notice is also our specialty .
I hope you all liked my post .
Hugs
Mallika Kejriwal


Wednesday 21 November 2012

Wall hanging tutorial

Helloall,
 its kavitha here to share a tutorial today.First of all i am so sorry for the poor pictures,my camera phone is already dying and top of it my computer is corrupted and all software's has been deleted,so not able to edit the pictures:(.
The tutorial is to make a mobile hanger with paper scraps.All you need is circle punch-from EK success,Martha stewart doily lace border punch,fevicol,stitching thread,pattern paper scraps and ribbon.

Take a 18" strip of card stock(2 inches width) and punch the border.Stick both the ends together,you will get a base like this.

Take the punches circle,apply glue and fix the thread in the middle and stick another punches circle over it.In this way the thread gets covered and both the sides will have patterns.In case you can stitch you don't need to stick the other sides,instead you can use double sided pattern papers.

I made 8 strands of punched circle and attached it to the base.For hanging it punch 4  holes on four sides in the base,take one meter of ribbon,put a knot on one side and attach it to  the base.Finally join all the four ribbons together and tie a bow.

Hope you liked it,you can try this with different shapes like heart,stars,butterflies etc.Best way to use your scrap too.This looks lovely in real.
 http://www.crafterscorner.in (All craft supplies under one roof)
For any further information regarding any of the products please contact :- info@crafterscorner.in


Happy crafting,
kavi

Monday 19 November 2012

Inspiration for Challenge #2 -Die cuts/Punches with Stamping!

Hi Everyone,
Sharing with you all a "Thank you" card which I have made keeping in mind our this times challenge theme which is to use "Die cuts /Punches" with Stamping (It can be a sentiment or an image)...So here's a look at what I have made :-


For my card most of the products used here are from our store Crafter's Corner...We have wide range of Craft supplies at quite an affordable price & in this card I have used  #Glossy Accents to create the dew drops on the flowers & incidently this is also one of the prize package for our this tine's challenge :)..Here's a look at how those flowers look with the dew drops :-

                                                                 
Don't these dew drops look so real ?...It was so easy to make this by just putting a drop of #Glossy Accents on the flowers  and letting it dry for few minutes...This bottle is Quite big and really a lot of value for money & it will last you for a very long time..And I found it very useful for glueing those delicate stems & leaves as the #Glossy  Accents has a very fine tip and is a transparent glue so dosen't leave smudges!

Products used for making this card :-

Pattern paper - Bo Bunny Alora Collection ( Crafter's Corner)- ( In the bottom half) & Cosmo Cricket in the other half
Light green Cardstock -DCWV
Glossy Accents - Crafter's Corner
Dies -
*Spellbinders Nestabilities Label 3 - Available at Crafter's Corner
*Cheery Lynn Fanciful Flourish -Crafter's Corner
Punches :
*Fiskars Lacy days of Summer Border punch (Available at Crafter's Corner)
*Martha Stewart Punch around the page- Vintage Floral (Available at Crafter's Corner)
Stamp : The Paper Company Studio(Available at Crafter's Corner)
Ink -Memento Rich Cocoa (Crafter's Corner)
Flowers:
*Large Peach Mulberry Flower -Crafter's Corner.
*Small  Dark Peach Mulberry flower on the Bottom - Crafter's Corner

Hope you like My card...Please do leave me your Comments/ Suggestions....It really helps me grow! :)
http://www.crafterscorner.in (All craft supplies under one roof)
For any further information regarding any of the products please contact :- info@crafterscorner.in
Have a good day everyone :)
                                               

Saturday 17 November 2012

Spinner Card - Tutorial


Spinner Card
By MallikaKejriwal
You will need –
1 patterned Cardstock  - 5 ¼ x 4 inches
1 solid cardstock -  5 ½ x 8 ½  inches
Dimensional
2 Pennies
Embellishments

You Can find the following products used in our store
Scoring Board - Scor pal  , Martha Stewart 
Patterned paper - Check out or DCWV range { Nothing beats of products and above that our prices }
We have launched some amazing new products which will be helpful in embellishing anything
Cutting papers in proper dimension won't be an issue .. check out our affordable trimmers. 

Step 1 –
Take a piece of patterned paper sized 5 ¼”  X  4”


Step 2 –
With the help of your craft knife, make a slit of ½ inches (tab) leaving ¾ inch border on sides and top.
See the picture below


Step 3 –
Now take a penny and attach a small dimensional to it .

Step 4 –
Now attach another penny to it . See the picture below .


Step 5 –
Stick Dimensional tape to the backside. Make double layer , so that it doesn't disturbs the revolution of coin


Step 6 –
Now take a 5 ½ by 8 ½ cardstock of any color which can used as a base


Step 7 -
Fold it into half 


Step 8–
Put up the the two cardstocks together


Step 9 - 
Now lets Decorate it by our content .


I hope you like it 
Hugs
Mallika 


Wednesday 14 November 2012

Punches and stamping

Hello crafters,
 hope you all had a great time celebrating diwali with lots of sweets n crackers:).Its kavitha here to share a card today,based on this moths theme.I have used punches and stamping in this card.Its a pretty simple card,but love how it turned out.I have paper pieced the flowers with pattern papers,colored the stems with Distress markers.The brush tip is super fine and very easy to color even the tiniest parts.The punch is from ek success-abstract flower.Distressed the edge with vintage photo distress inks.
I applied a coat of Crackle accents on the flower,i guess is not visible much in the photograph.Please click on the picture to enlarge so that you can see the details.It really gives a glossy finish with crackled effect.


Hope you liked my card.Do join us with the Punches/dies challenge with stamping this month.If you ahve any queries reagrding the products used drop in a mail to mshalini79@yahoo.com

Happy crafting,
kavi


Monday 12 November 2012

Happy Anniversary

Hello Crafters  
I am extremely sorry for a super late post .. I have had loads of mishaps last week .. which delayed the post.
Here is the list of mishaps 
1) My resume was shortlisted for Samsung Engineer Profile in SCM  - I went there gave aptitude written test - Made it to top 7 - was thrown out from Top 5 in technical written   :( { I was in depression state for 24 hours , crying at every little thing, I wanted this job badly } 
2) My laptop stopped working the same day - hard Disk corrupt n charging point broken . 
3) My best friend and I had a huge fight and it has left me emotionally damaged . 
4) My CAT paper was all screwed up !! 
So I hope I have justified why I couldn't post . 
But still I believe " HOWEVER DARK B THE NIGHT , THE DAWN WILL BREAK "OOD 

One Good News - I am a Proud Owner of DSLR CANON 600D camera  ! 
The picture quality is super awesome .. my projects are finally getting justice :P


Now onto my project 
I have made a scrapbook Layout .. which has loads of interesting supplies used .. 
I have made a scrapbook cover layout which has a panel which opens up to put a picture . 
The panel  has beautiful Mulberry Flowers .. 
I have used Fleur Rectangles for making the frame . The stamp used is TPC all occasions available with us
The beautiful leaves are also from our store . 
Can you see that die which has a button in it  ..Its spellbinders also from our store .
The entire panel has been distressed using Vinatage Photo , Aged Mahagony 
I have given the panel a torn look using my Heart Distress Tool . It is perfect add to my stash . 
The other supplies are from my stash ! 

Hugs
Mallika 
For larger pictures you can hop on to my blog or simply click the pictures .
For any queries please drop mail .